

Programming HASU HHKB ALT controller with very little programming back ground
I recently acquired a HHKB with Hasu’s BT controller. The keyboard and key layout worked out surprisingly well after an adjustment period for about 2 weeks. I even prefers the new location of the backspace and struggled to find or what to program an extra key into when I am doing my final key mapping.
How ever, there were some key keyboard parameter I wish to change to accommodate my AutoCAD drafting style/speed and make it a bit more gaming friendly for games that actually requires the F Rows.
So few things I need to change.
First, shorten the scan delay in from the default 75 us to 30 us. (probably matter very little in the grand scheme of things, but why not)
The exact detail is here https://geekhack.org/index.php?topic=12047.500 Post 515
This can only be achieved by changing following values in Matrix.c of the HHKB firmware files
#ifdef HHKB_JP // Looks like JP needs faster scan due to its twice larger matrix // or it can drop keys in fast key typing _delay_us(30); #else _delay_us(75); #endif
I need to change the delay_us(75) to delay_us(30)
Second, changes the timing a button needs to be held in order to make it into a dual role key.
(I use this to make esc into normal esc key when tapped, but shift keys into L1 when held on for a period of time., useful for games and AutoCAD that generally still needs F row keys. I CAN use the normal Fn key, but most of the time that requires to re-angle or re-position my hands.
Third, changing the number of taps needed to layer toggle instead of momentary layer shift. Current default is 5, but I felt just three is more than enough to ensure no accidental triggers.
There two options can be changed in config.h of the HHKB firmware files
/* period of tapping(ms) */
#define TAPPING_TERM 300
/* tap count needed for toggling a feature */
#define TAPPING_TOGGLE 5
/* Oneshot timeout(ms) */
#define ONESHOT_TIMEOUT 300
I need to change the#define TAPPING_TERM 300 to 125
I also need to change the#define #define TAPPING_TOGGLE 5 to 3
A bit of a rant first.
Alright, let me make this clear, my programming ability is very limited. it peaked in college when I was still studying machine intelligent/processing as an electrical engineering student, and now I have forgotten majority of it after not doing so for 8 years since my work does not relate to it. So everything is a relearning process.
For starter. Maybe it’s due to my windows 10 being all screwed u from years of usage, but a ton of the recommended program did not work properly from the start.
Docker could not initialize correctly. Reasons? I don’t know. Tried looking up what’s wrong with it, tried some fix with online suggestions as well, didn’t do anything to fixture the problem.
Virtual machine with the ubuntu copy that Hasu provides on the TMK documentation works, but it won’t save the current state correctly. Leading to the problem that if I ever want to modify my current work, I have to start fresh every time, and even after trying to look up what the issue was, I can’t seem to find a solution. (there is probably a way to create a new personal folder on github, and just save/load from it. but honestly, I’m not going bother messing with something that’s broken from the start.
This leaves me with one option left, using cygwin and the AVR toolchain in native windows 10 to compile the damn thing.
Rant Finish…..
The starting point of using Cygwin and AVR Toolchain is listed here under the TMK set up. https://github.com/tmk/tmk_keyboard/blob/master/tmk_core/doc/build.md#1-install-tools
Alright, first of all, the guide is a bit outdated
Cygwin is fine. you can find it here. https://www.cygwin.com/
But wait…. there is a catch, Cygwin doesn’t install everything you need by default please refer to this video for general set up.
https://www.youtube.com/watch?v=hh-V6el8Oxk
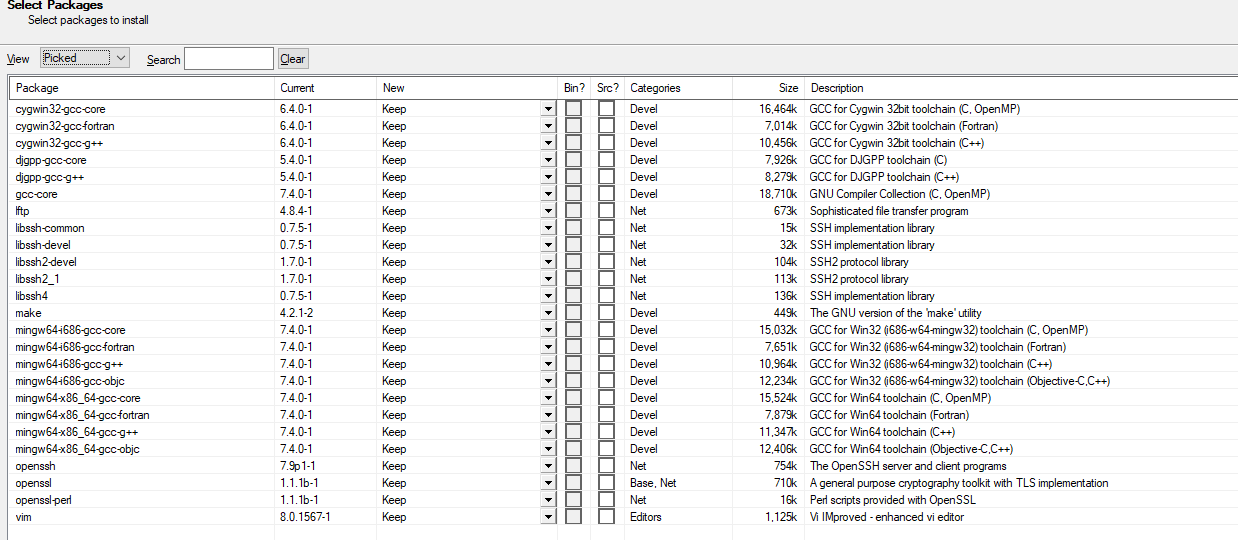
However, the package mentioned in here is a bit outdated as well, it also failed to mention gcc-core installs that apparently is needed for some TMK application. See picture below for what I ended up needed to install to get it running.
AVR toolchain however, is no longer available on the official web site. Almost no installation guide on TMK mentions this, but it’s now a part of the package under Atmel Studio 7.0.
Which can be found here.
https://www.microchip.com/mplab/avr-support/atmel-studio-7
You also need to add path for the AVR toolchain, following the same system variable adding instruction above, but you need to add these two paths.

Flip install can be found here.
https://www.microchip.com/developmenttools/ProductDetails/FLIP
Download the full source code for TMK here
https://github.com/tmk/tmk_keyboard
the Cygwin terminal, can be found at
C:\ProgramData\Microsoft\Windows\Start Menu\Programs\Cygwin
or under the Cygwin installed folder, mintty.exe
now….. if you are completely new to programming, or forgot about it like me.
the .h and .c files can be edited via normal note pad, but an programing editor would be more ideal. luckily the Atmel Studio has one comes with it… double click on either files and you should be able to edit them.
Do your edit, once everything is set up, you need to compile the file using Cygwin
for me, the command is as followed.
First, set the file path to where they are stored. (it’s currently installed in my c driver, keyboard folder)
cd /cygdrive/c/keyboard/tmk_keyboard-master/keyboard/hhkb
I use the BT hasu controller so the following step is
make -f Makefile.rn42 clean
I just edited the kaymap of the original hhkb keymap. , so the next command is
make -f Makefile.rn42 KEYMAP=hhkb
a .hex file should be generated now, and now we can finally flash this using flip.


